How to Set Up Instagram for Growth: 9 Settings I Turned On to Reach 5,000 Followers in 3 Months
Before your first post, set up 9 things: go public, switch to professional, allow Google indexing, sharing and reuse, Reels translation, highest-quality uploads, crossposting to Facebook, content preferences and Account Status. I opened my account at the end of June 2026 and hit 1,000 followers in month one, 5,000 in three months and 7,200+ now. Screenshots and Instagram's official explanations for every step.
After you create an Instagram growth account and before your first post, set up the back end: make the account public, switch to a professional account, allow search engine indexing, and turn on every sharing and reuse option. The first four decide whether your content can reach strangers at all; the other five help you make better content and avoid getting stuck. I opened @zeona_co on the last day of June 2026, reached 1,000 followers in month one and 5,000 in three months, and I'm past 7,200 now and still growing. This is the checklist I set up on day one, with Instagram's own official explanation under every screenshot.
TL;DR:
① Go public: private accounts can't reach Explore, Reels recommendations or search.
② Go professional: that's how you get insights, Trial Reels and partnership ads. Pick "Creator" for a personal brand.
③ Search engines: turn on "Allow public photos and videos to appear in search engine results" for a Google traffic source.
④ Sharing and reuse: turn on sharing, reposts, remixes, downloads and embeds. Each one is another path for your content to travel.
⑤ The other 5: Reels translation, highest-quality uploads, crossposting to Facebook, content preferences and Account Status.
Every setting starts from the same place: your profile → the ☰ menu at the top right → "Settings and activity". The screenshots are from an iPhone with the app in Traditional Chinese, so the English menu names are written in each caption. Labels can differ slightly by app version and on Android.
Step 1: Make your account public
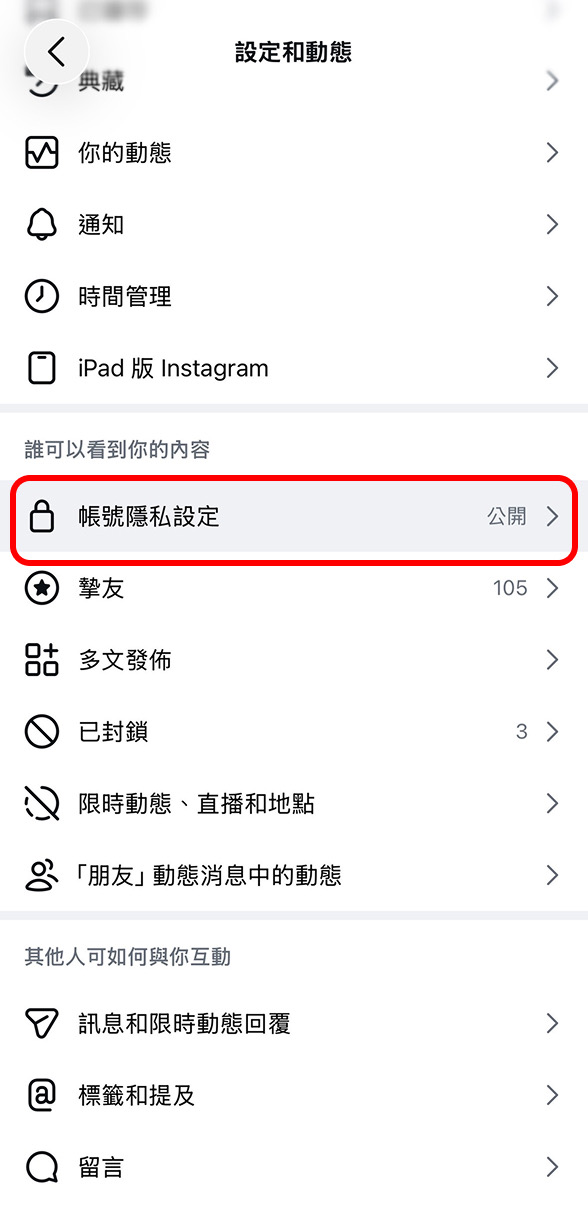
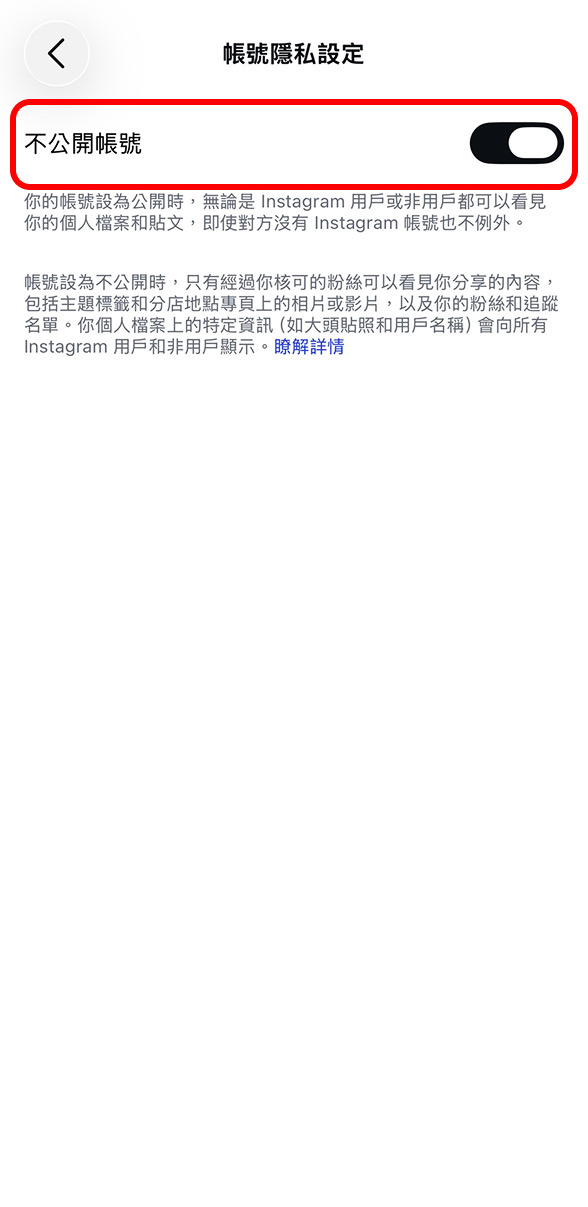
When your account is public, your profile and posts can be seen by anyone, on or off Instagram, even if they don't have an Instagram account. When your account is private, only the followers you approve can see what you share, including your photos or videos on hashtag and location pages, and your followers and following lists.
Source: in-app text
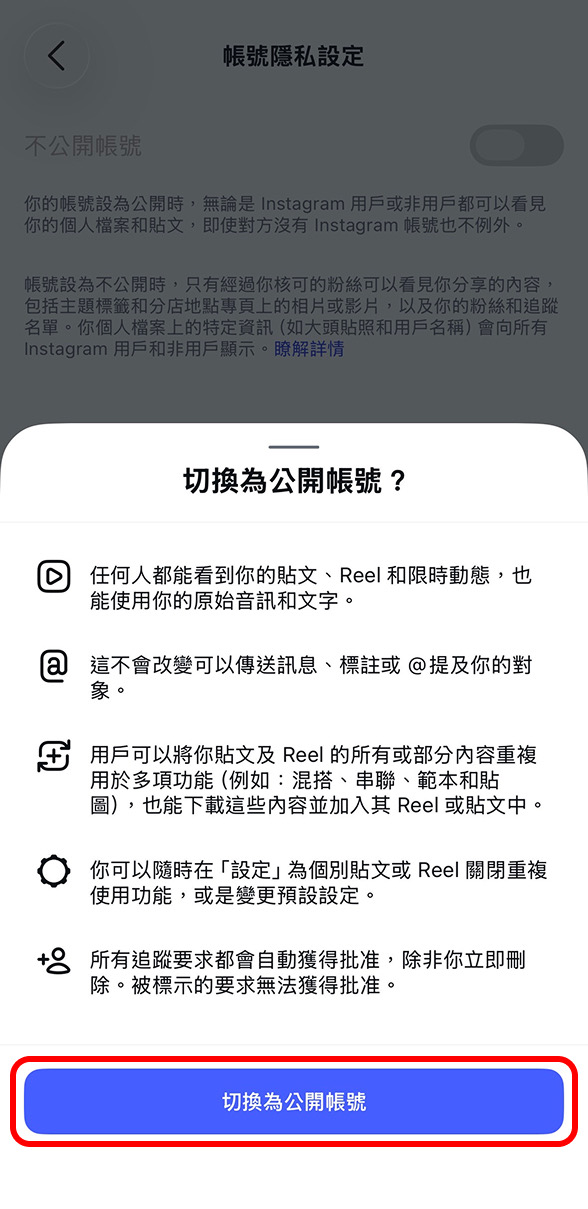
Anyone can see your posts, reels and stories, and can use your original audio and text. All follow requests will be approved automatically. A private account's posts are hidden from non-followers in search results, Explore and hashtag and location pages; its reels can only be seen by approved followers, and no one can remix them.
Source: in-app text + Instagram Help Center, "Differences between public and private accounts"
Why set it this way: a private account is a shop with the door locked. Explore, Reels recommendations and search can't show you to strangers, so even great content only reaches the followers you already have. For a growth account, going public is step one.
Step 2: Switch to a professional account and pick a category
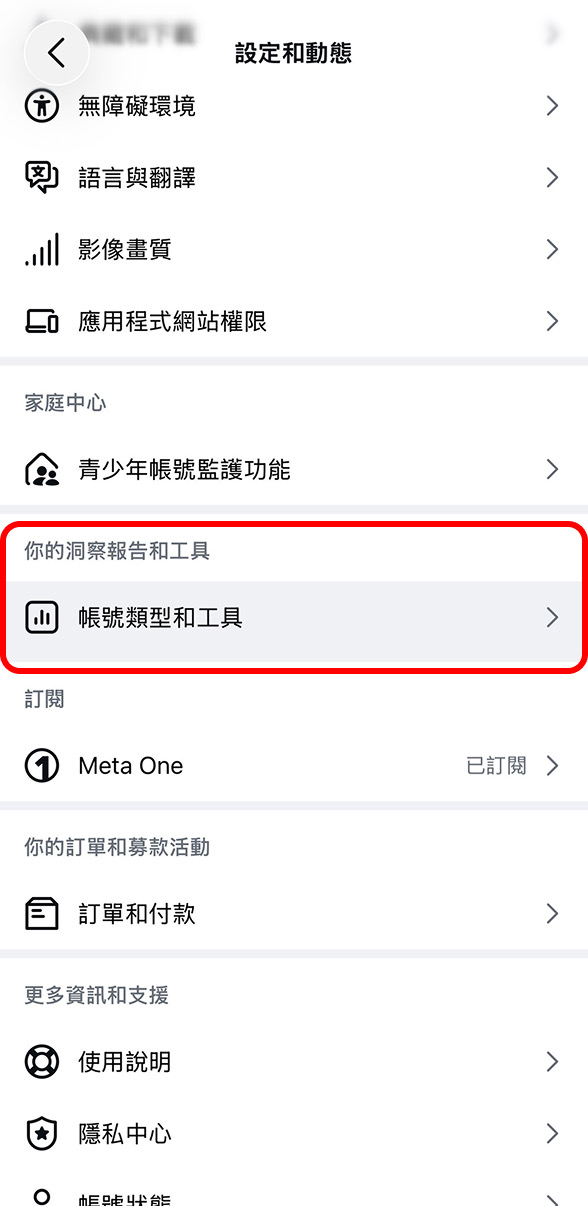
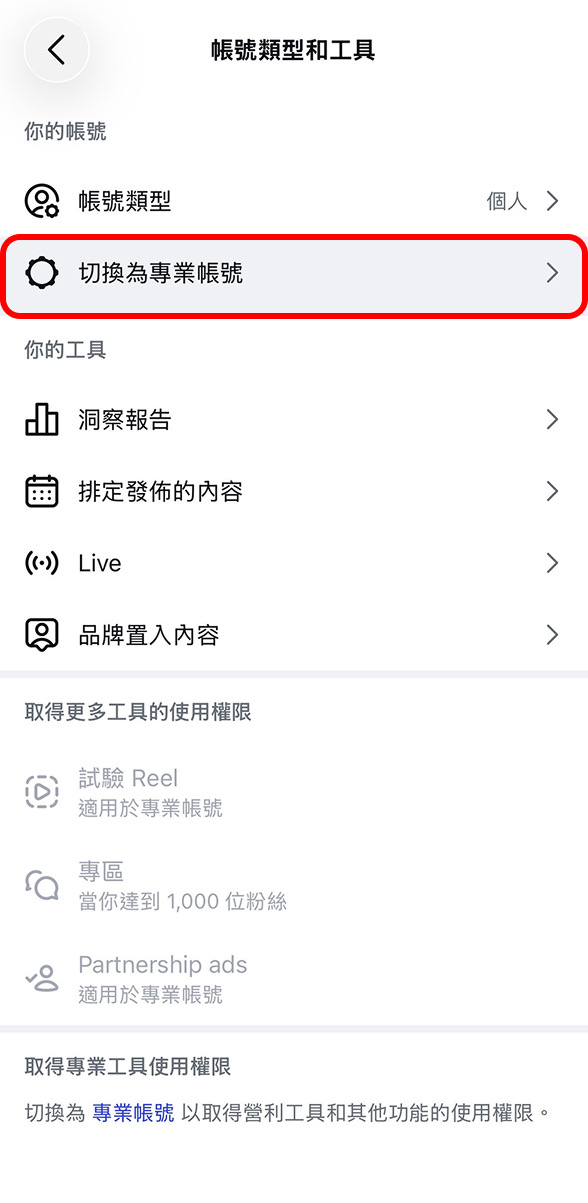
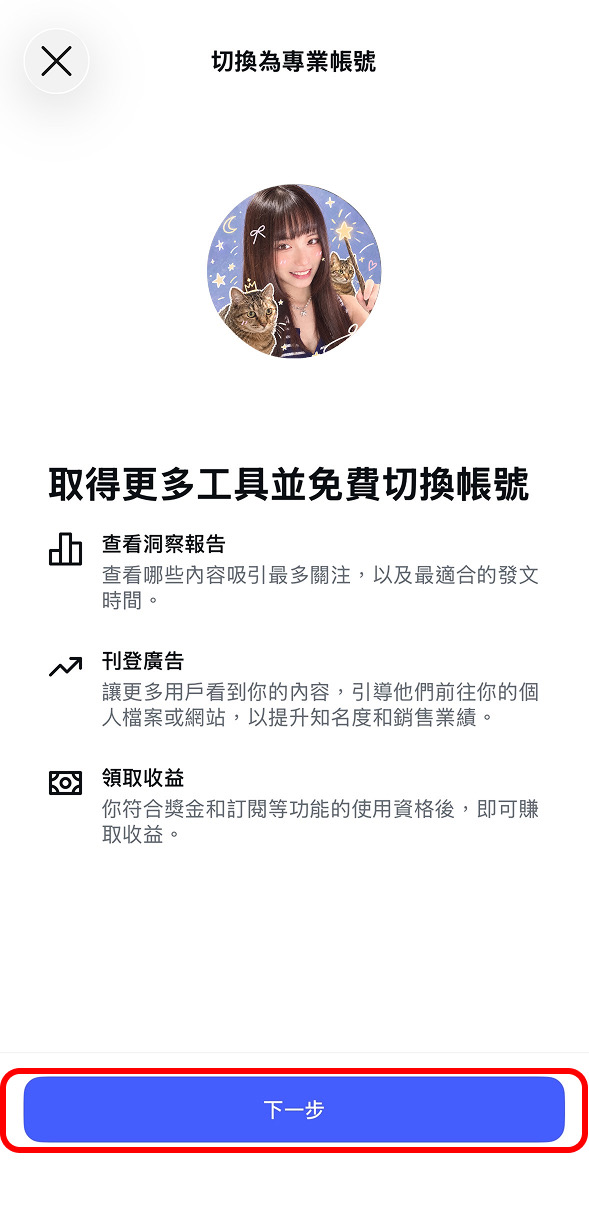
Get more tools and switch for free: view insights (see which content gets the most attention and the best times to post), run ads (help more people see your content and send them to your profile or website), and earn money (once you're eligible for features like bonuses and subscriptions).
Source: in-app text
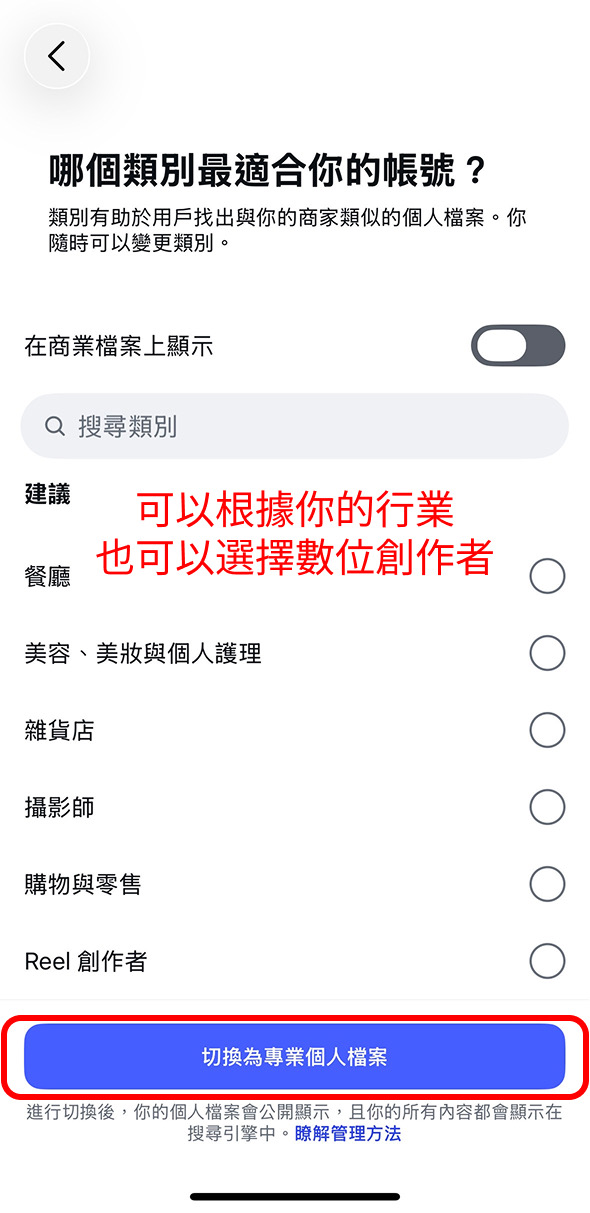
Categories help people find profiles similar to yours, and you can change your category at any time. After you switch, your profile will be public and all of your content can appear in search engines. Professional accounts come in two types, Creator and Business, and you can switch between them later. Professional accounts can't be set to private, and insights cover any period within the past 90 days.
Source: in-app text + Instagram Help Center, "About professional accounts"
Why set it this way: without insights you can't tell which video brought in followers or when your audience is online, so you're posting on gut feeling. For a personal or knowledge-based account I'd pick Creator; choose Business if you have a physical shop or sell products. The "Display on profile" toggle only decides whether the category label shows on your profile.
Step 3: Allow your photos and videos in search engine results
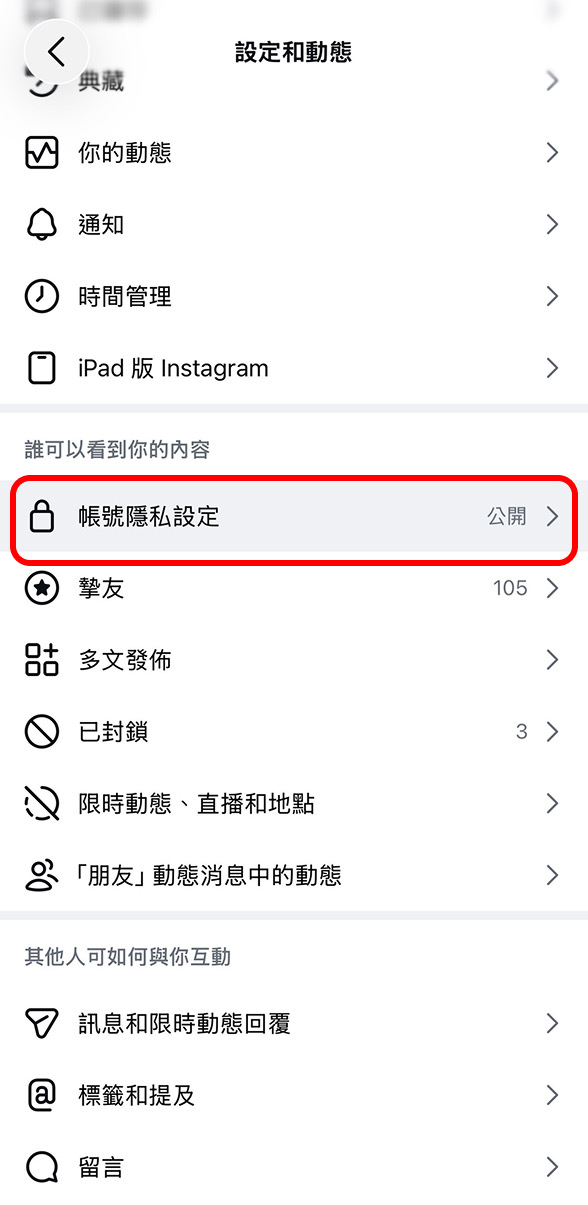
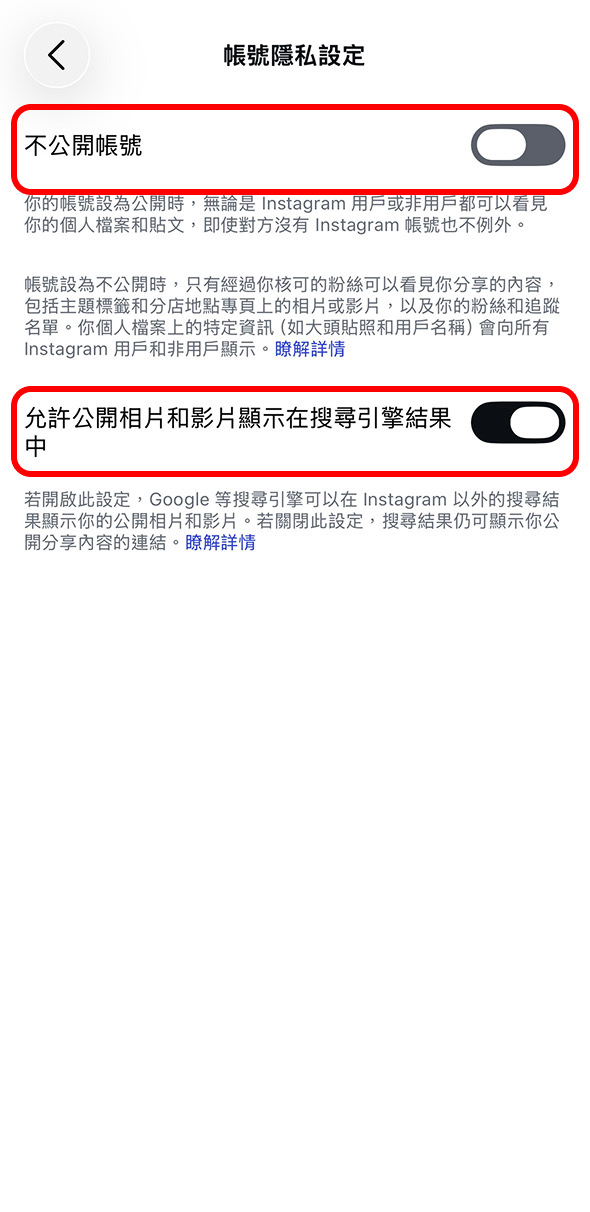
If this setting is on, search engines like Google can show your public photos and videos in search results outside of Instagram. If it's off, search results can still show links to content you've shared publicly.
Source: in-app text
Why set it this way: since 2025, Instagram lets search engines like Google index public photos and videos from public professional accounts, and this option only appears once you are one. With it on, when someone googles a phrase like "ChatGPT photo editing prompts", your post can show up in the results. That's a traffic source that doesn't depend on the algorithm, and it's why your captions and the first slide of a carousel should contain the words people actually search for.
Step 4: Sharing and reuse, turn everything on
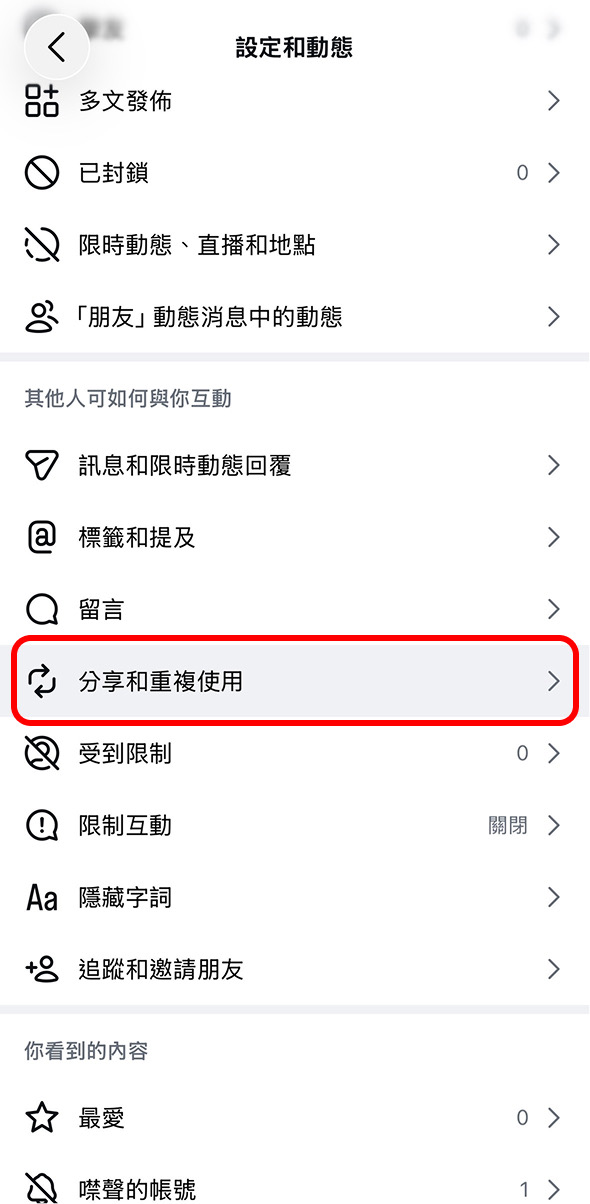
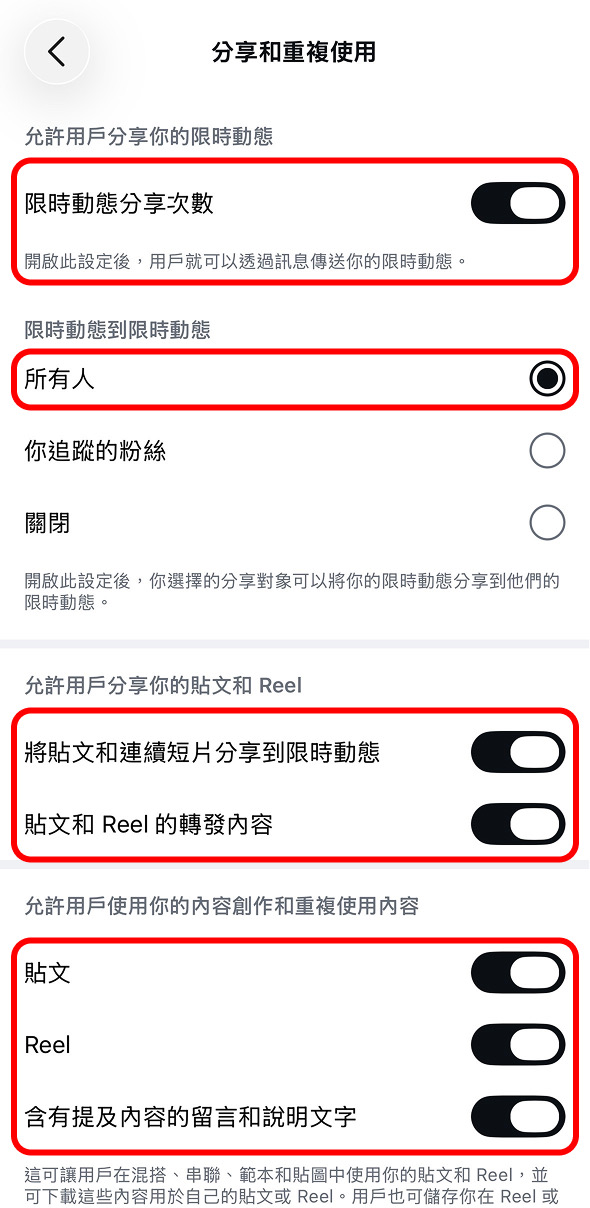
Story sharing: when this is on, people can send your story in a message. Story to story: when this is on, the audience you choose can share your story to their own story. Reuse: this lets people use your posts and reels in remixes, sequences, templates and stickers, and download them for their own posts or reels. To turn off reuse for a specific post or reel, go to that content's "More" menu.
Source: in-app text
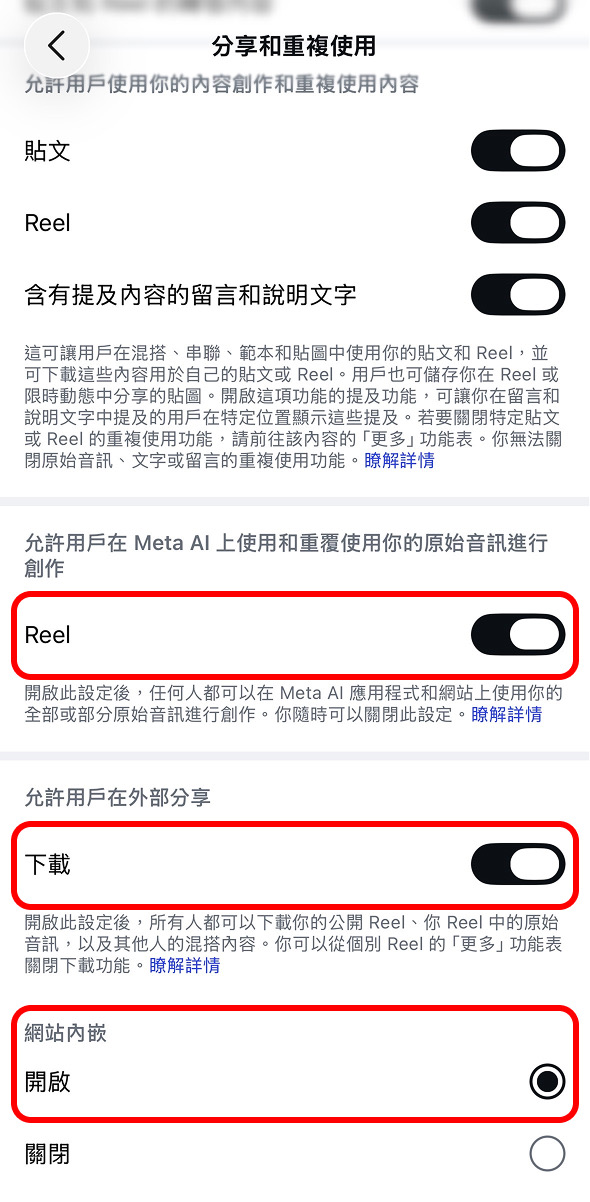
Downloads: when this is on, anyone can download your public reels, the original audio in your reels and remixes others made. Downloaded reels carry an Instagram watermark, your username and audio attribution, and can't be used commercially. Website embeds: when this is on, your public posts or profile may appear outside Instagram, including in articles and blogs.
Source: in-app text + Instagram Help Center, "Downloading reels"
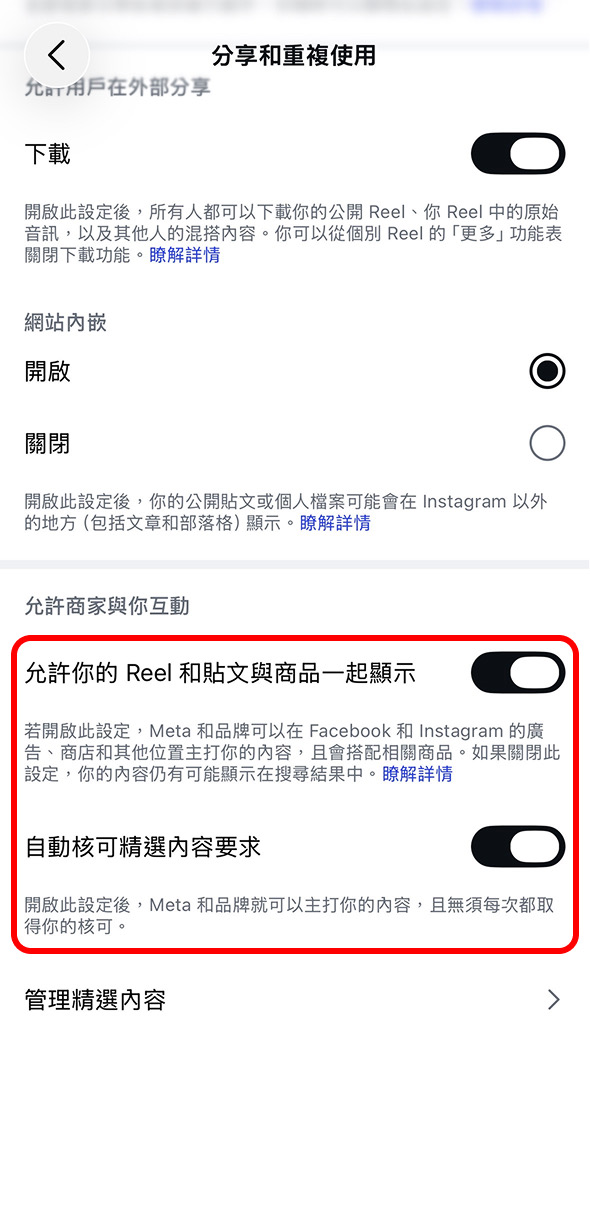
Shown with products: if this is on, Meta and brands can feature your content in ads, shops and other places on Facebook and Instagram, paired with related products. Auto-approve featured content requests: when this is on, Meta and brands can feature your content without asking for your approval each time.
Source: in-app text
Why set it this way: Adam Mosseri, the head of Instagram, has said publicly that how often a post gets sent to other people is one of the most important signals for reaching non-followers. Every sharing, repost, remix, download and embed path is one more way your content can travel; turning them off blocks your own road. The two brand-related toggles at the bottom are worth turning on if you want brand deals. If you're uneasy about brands using your content, turn off auto-approve and approve each request yourself.
Step 5: Language and translations, turn on Reels translation
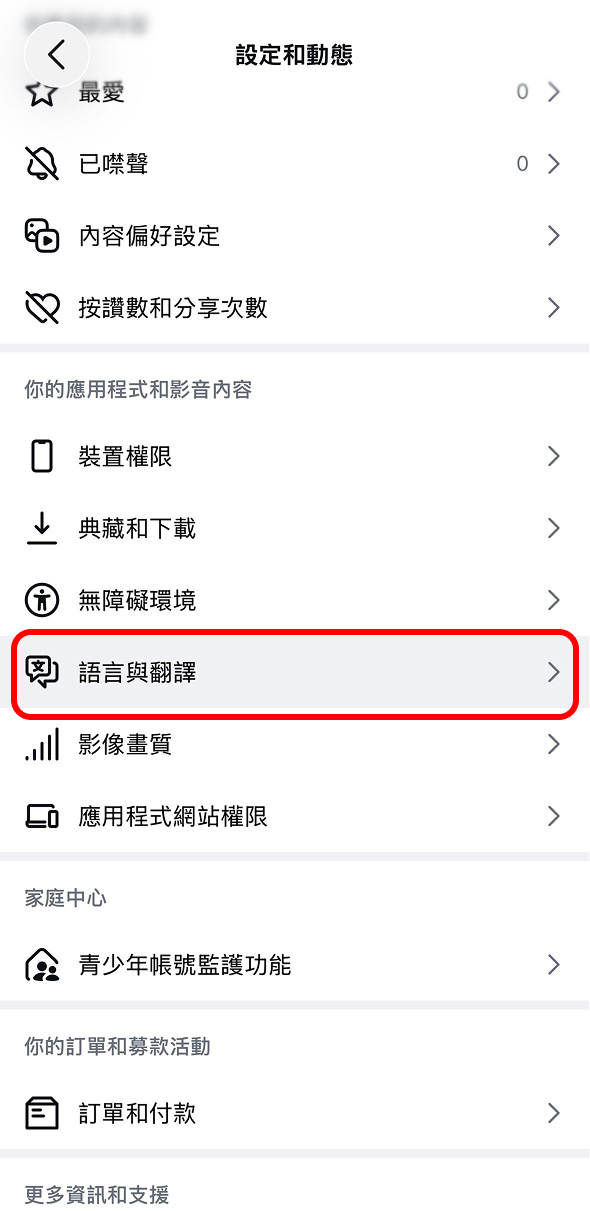
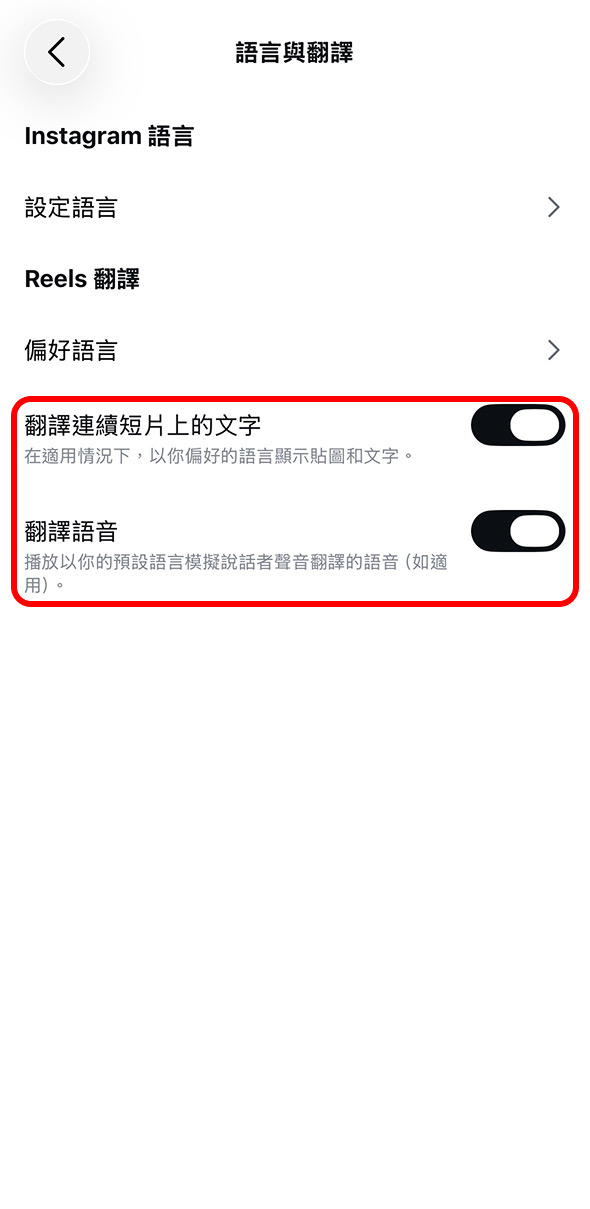
Translate text on reels: where available, shows stickers and text in your preferred language. Translate voices: plays audio translated into your default language that simulates the speaker's voice, where available. Meta AI translations launched in August 2025, and Meta lists English, Spanish, Hindi and Portuguese as the currently supported languages.
Source: in-app text + Meta for Creators blog, "Meta AI translations"
Why set it this way: a growth account has to study what's going viral elsewhere; plenty of topics blow up in one language weeks before they reach yours. With translation on, you understand foreign Reels faster and can see why they worked. Your language may not be on the voice list yet, but leaving it on costs nothing and the list keeps growing.
Step 6: Media quality, always upload at the highest quality
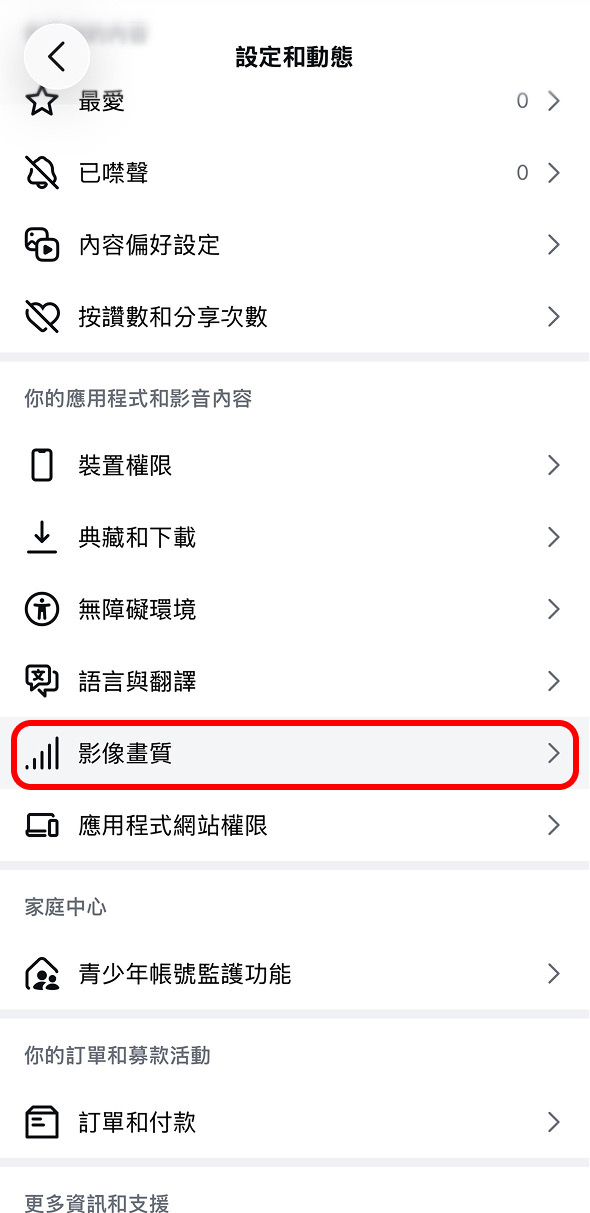
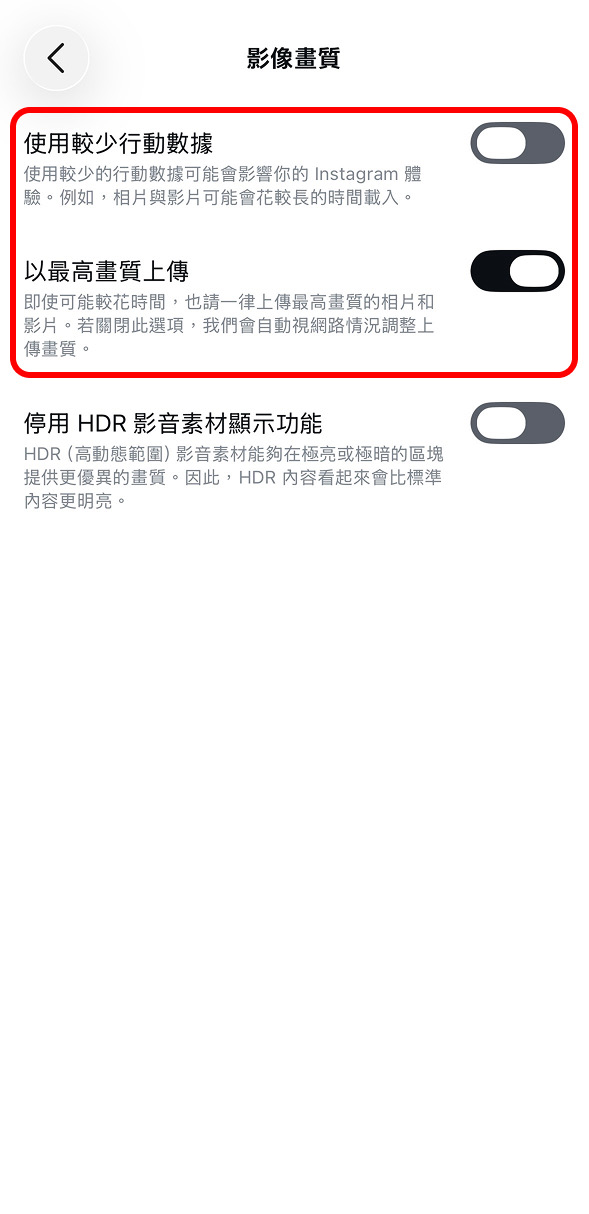
Use less cellular data: using less mobile data may affect your Instagram experience; for example, photos and videos may take longer to load. Upload at highest quality: always upload the highest quality photos and videos, even if it takes longer; when this is off, we'll automatically adjust upload quality to your network conditions.
Source: in-app text
Why set it this way: "Upload at highest quality" is off by default on many phones. Without it, Instagram compresses your upload whenever the connection is slow, and your video or the text on your carousel comes out blurry. Blurry content gets swiped past faster. The only cost is mobile data, so post big files on Wi-Fi.
Step 7: Crossposting, share automatically to your Facebook Page
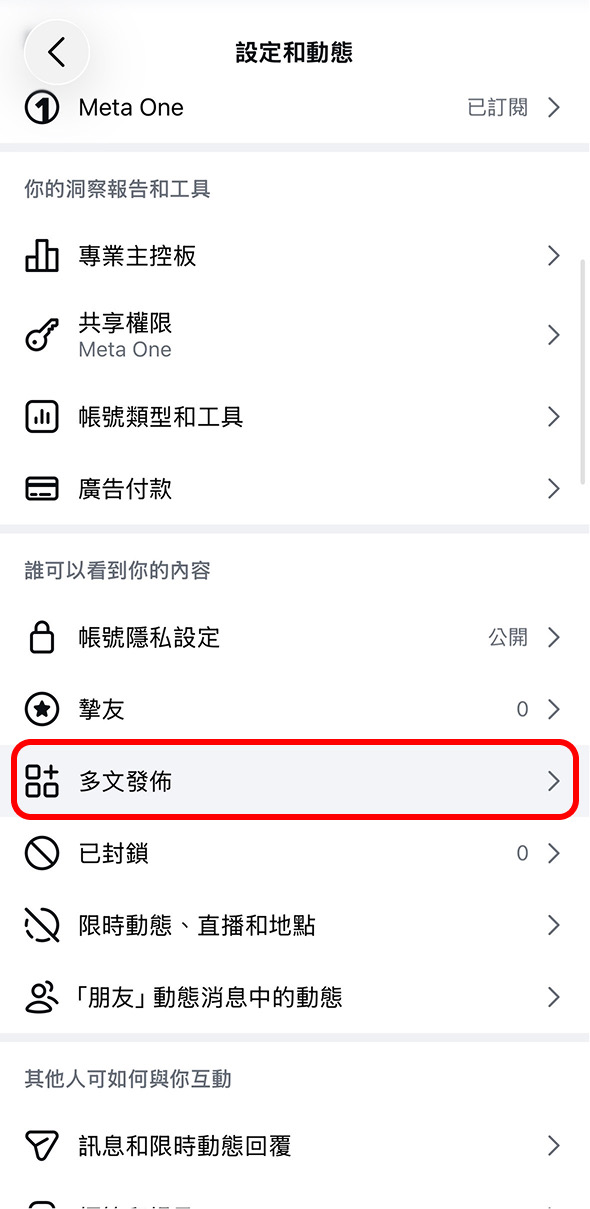
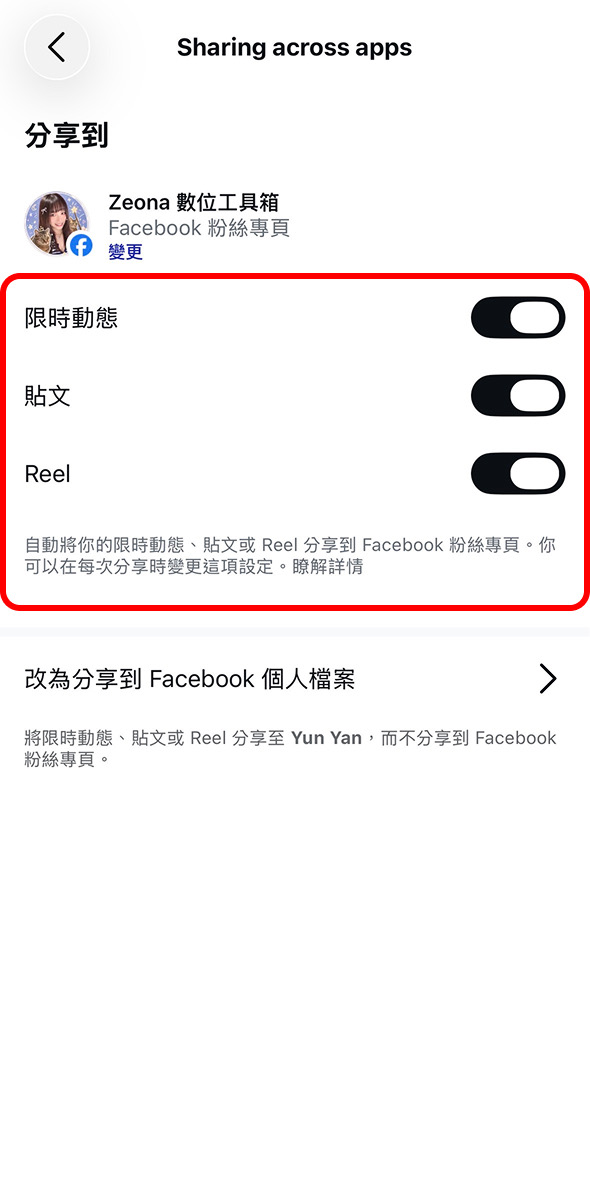
Automatically share your stories, posts or reels to your Facebook Page; you can change this each time you share. Your Instagram and Facebook accounts need to be in the same Accounts Center first; once this is on, what you share on Instagram is also shared to Facebook.
Source: in-app text + Instagram Help Center, "Share posts, stories and reels from a professional account"
Why set it this way: same video, zero extra work, views on one more platform. Facebook's audience tends to skew a bit older than Instagram's, and sometimes a video that was just okay on IG does better there. No Facebook Page? You can share to your Facebook profile instead with the option underneath.
Step 8: Content preferences, train the algorithm into your research assistant
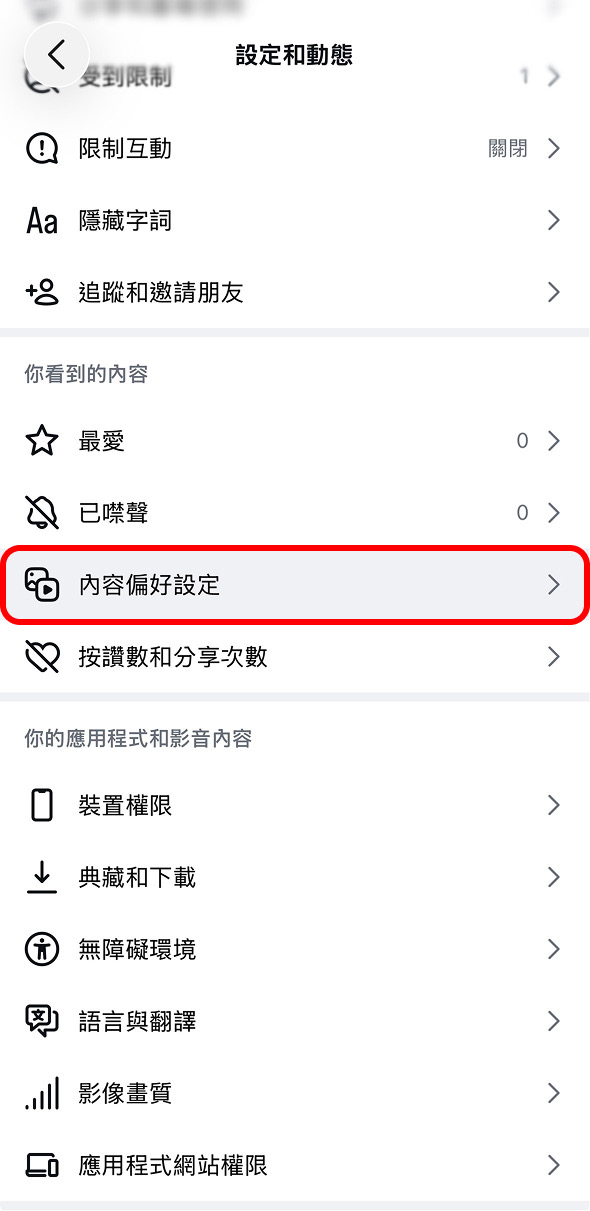
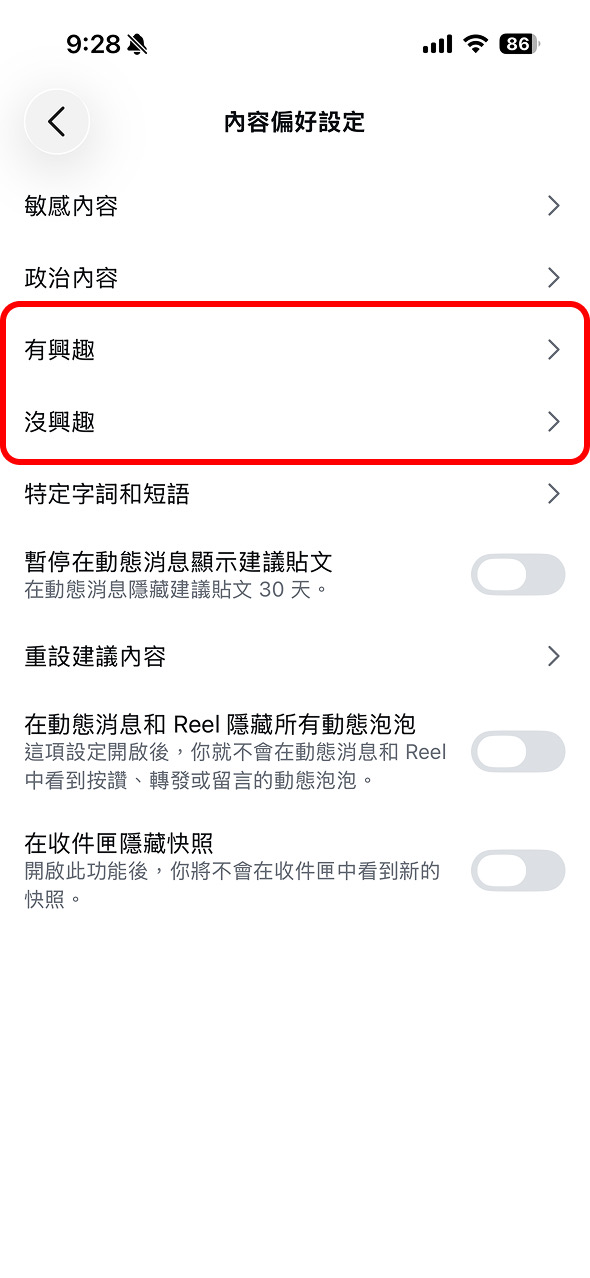
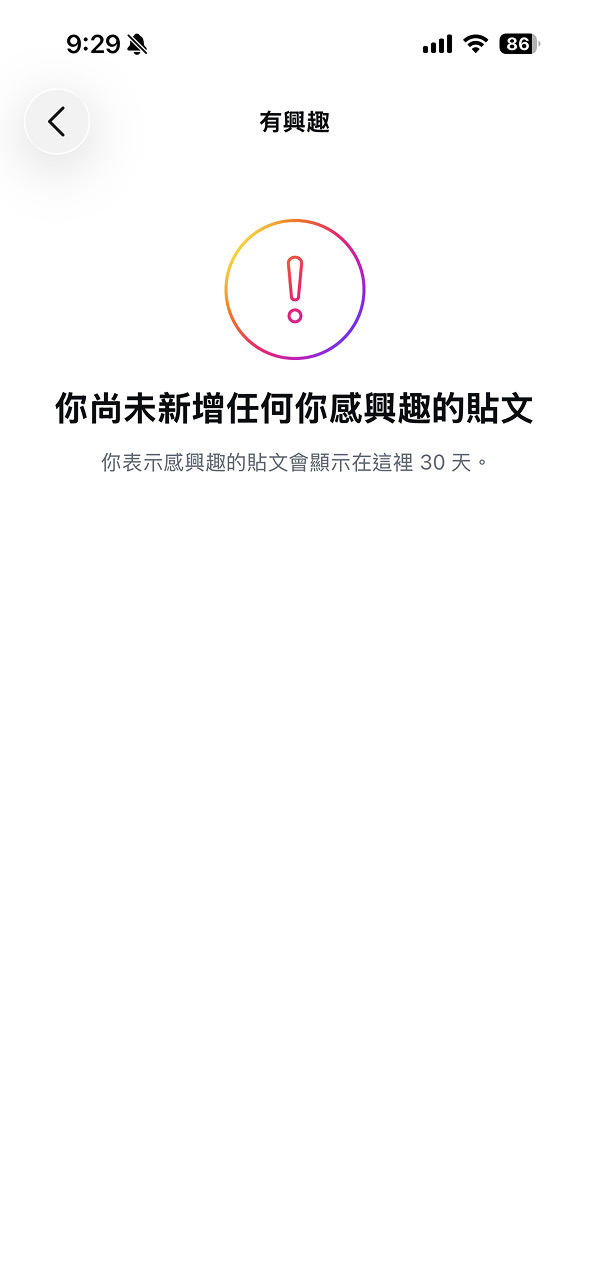
Posts you've marked as interested appear here for 30 days. Tapping "Not interested" on a post removes it from your feed right away and you'll see fewer posts like it. If your feed gets messy, "Reset suggested content" on the same page lets you start over.
Source: in-app text + Instagram blog, "How to See More of What You Want on Instagram"
Why set it this way: what you scroll decides which viral posts you get to see. When you find a great Reel in your niche, tap "⋯" → "Interested"; for anything unrelated, tap "Not interested". After a week or two your Explore page turns into a library of viral content in your field, which makes finding topics and doing competitor research much faster. Use your growth account only for your niche and keep personal interests on another account.
Step 9: Account Status, check for five green ticks
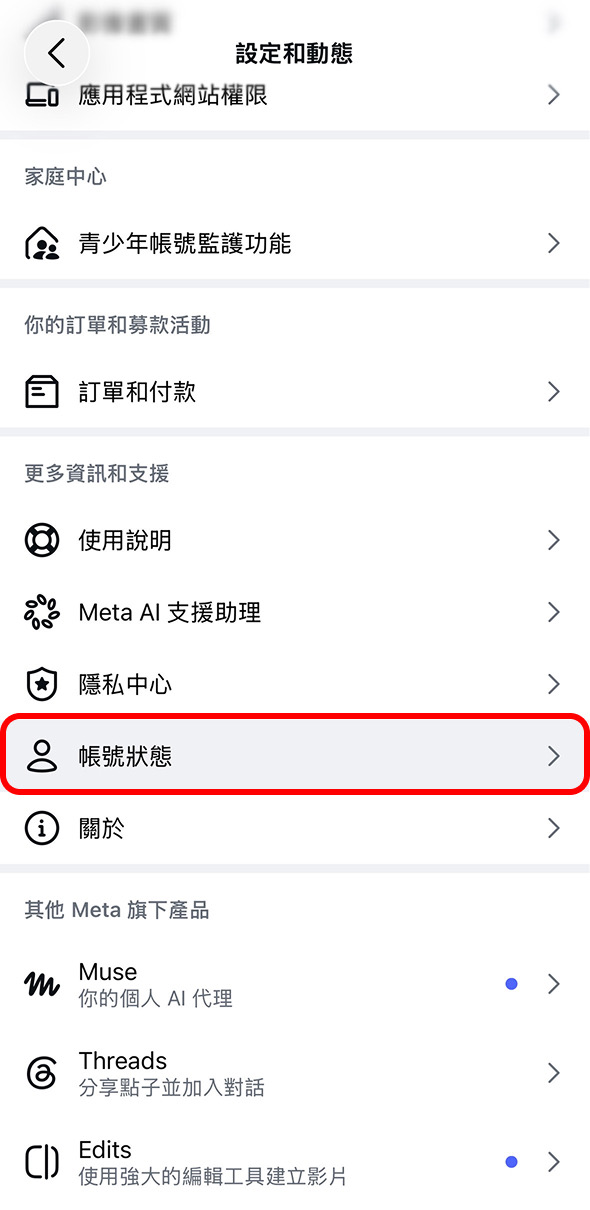
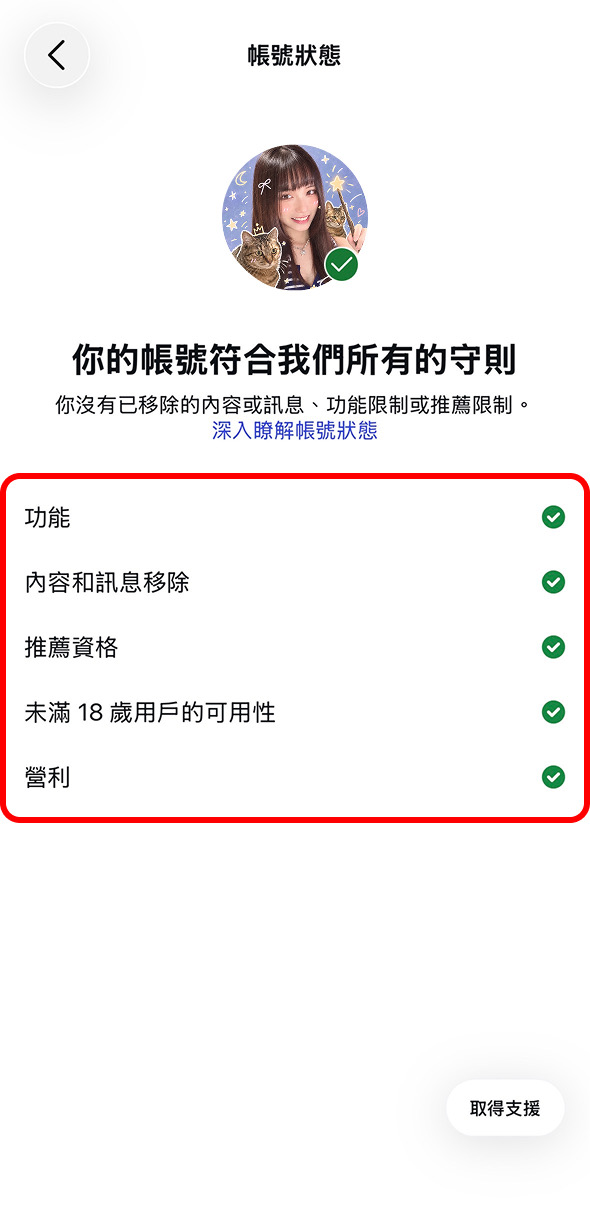
Account Status shows whether your content goes against the Community Guidelines or Recommendation Guidelines, and whether your account has any feature restrictions. Recommendation eligibility means whether your content can be recommended to people who don't follow you, for example in Explore, Reels and Feed recommendations. If content isn't eligible, Account Status shows which posts or which part of your profile, and you can edit, delete or request a review.
Source: Instagram Help Center, "Check your Account Status on Instagram"
Why set it this way: once recommendation eligibility turns red, your content stops reaching strangers and your views drop to only your followers. My habit: whenever views drop suddenly, or after posting something a bit sensitive, I check here first. If anything is red, follow the instructions instead of pushing on with more posts.
Settings done. What do you post next?
Settings only pave the road; what you post and how you post it decides your follower count. I turned the way I grew @zeona_co from zero into the AI Social-Media Playbook: audience and competitor analysis, bio, viral Reels breakdowns, Reels scripts, carousels, Story engagement and a 30-day calendar, each with AI prompts you can copy straight away. I reached 1,000 followers in month one, 5,000 in three months and 7,200+ now following it (your results will vary with your niche and execution).
It keeps getting updated: AI video editing, finding topics with search trends and competitor analysis are coming next, and every future update is included.
Settings done? Get the full IG toolkit →
FAQ
Q1: What's the difference between a personal and a professional Instagram account?
Professional accounts get insights, a contact button, a category label, ads and monetization tools, and Trial Reels; personal accounts get none of these. Switching is free and reversible. The trade-off is that a professional account can't be set to private.
Q2: Should I pick Creator or Business?
Personal brands, educators and content creators should pick Creator. Brands with a physical shop or products and services to sell should pick Business. For the category, choose your industry or "Digital creator"; you can change it any time.
Q3: Can Instagram posts show up in Google search?
Yes. A public professional account can turn on "Allow public photos and videos to appear in search engine results" under Account privacy, and search engines like Google can then show its public photos and videos in their results.
Q4: Is it safe to let people download my Reels?
Downloaded reels carry an Instagram watermark, your username and audio attribution, and Instagram doesn't allow them to be used commercially. To block downloads for a single reel, turn it off from that reel's "More" menu.
Q5: How often should I check these settings?
Once, when you set up the account. Instagram changes often, though, so after a big app update it's worth running through the list again and checking that recommendation eligibility in Account Status is still green.
Further reading
- AI Social-Media Playbook|Viral IG Reels × Carousels × Story Engagement
- Zeona Toolbox: free prompt kits
※ Screenshots are from the iPhone Instagram app in November 2026 (Traditional Chinese UI). Official explanations quote the text on each settings screen and the Instagram Help Center. Menu names and locations may change after Instagram updates.


